 Документація DMSS
Hub Settings
Configure alarm hub settings including user management, arming schedules, and system settings.
Figure 1 Hub Settings
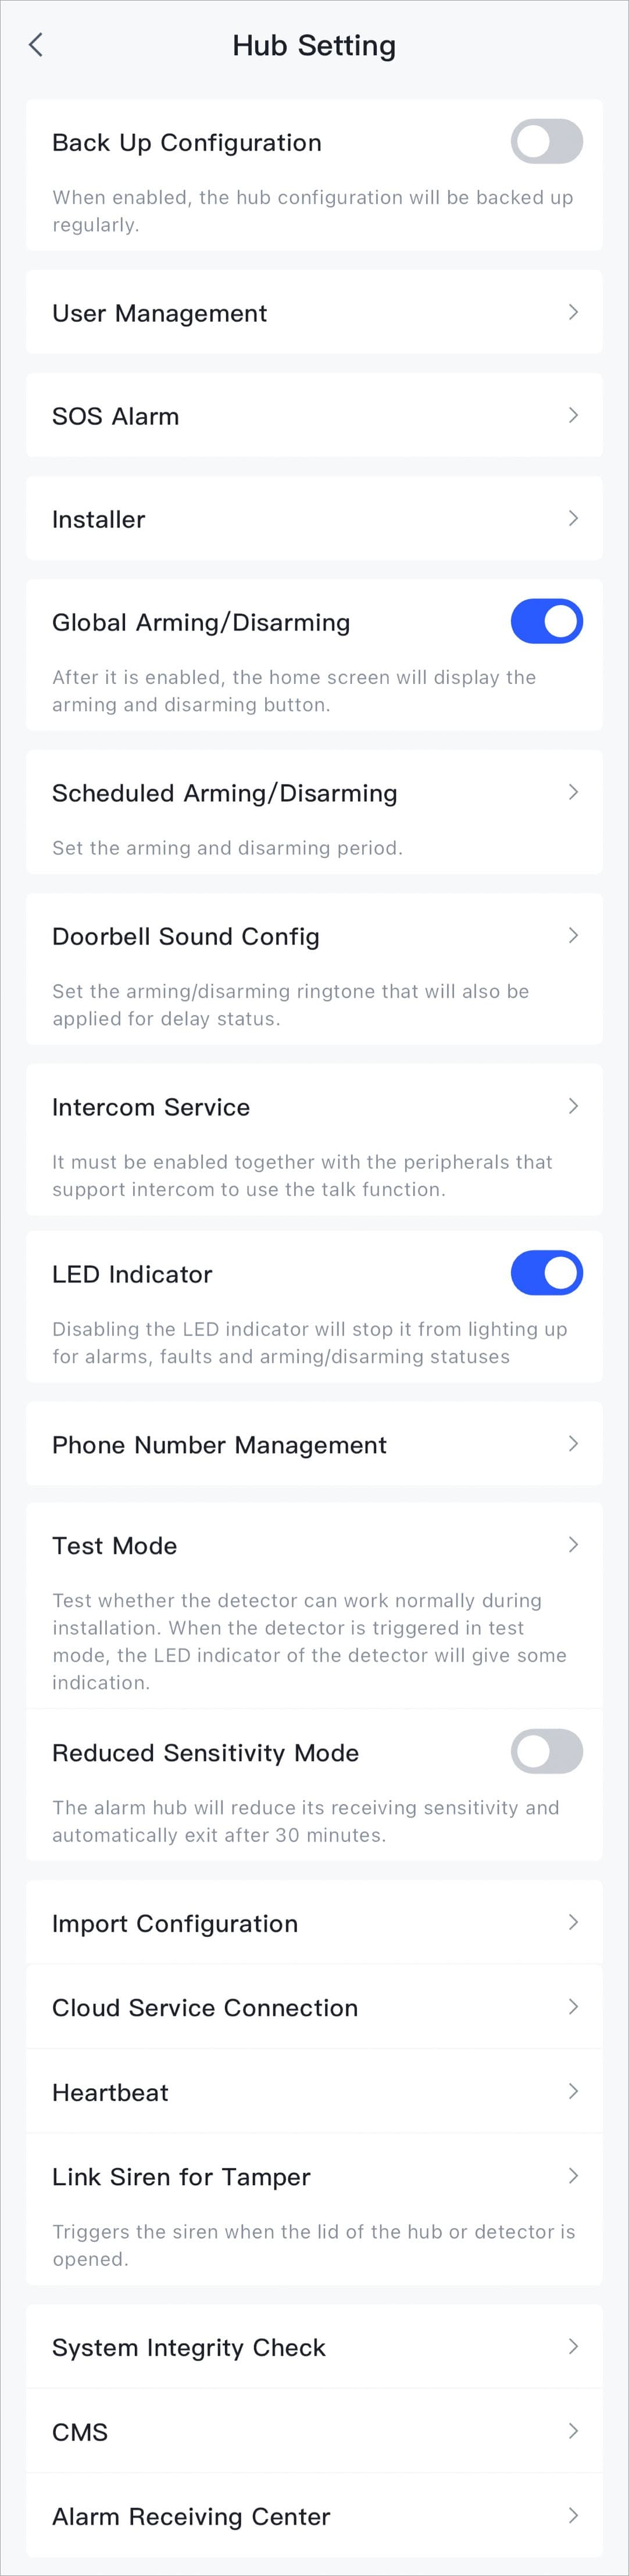
Back Up Configuration
Tap  /
/  to enable or disable the function. When it is enabled, the alarm hub configuration will be backed up and upload the backup to the cloud platform regularly.
User Management
You can add, modify, or delete keypad users when it is disarmed.
-
App user: Displays the DMSS users and the shared users. Tap the app user to configure the permissions. Supports configuring the permissions of arming/disarming operation, SOS button control, peripheral (relay, wallswitch and smart plug) switch control, bypass operation, snapshot and alarm video.
You can also configure the notification permissions. The user will not receive the corresponding type of notification when it is disabled.
-
Keypad User: Tap Add to add a user. Enter your username, passcode, and duress passcode, and then select arming and disarming permissions for the room.
- Passcode and duress code must be 4 to 6 digits.
- Duress passcode is optional.
- Up to 32 users can be created. The first created user is the admin user by default. All the permissions are available to them.
-
Deleting keypad User: Tap
 next to the corresponding user, and then select Delete.
The admin user must be the last to be deleted.
-
Modifying keypad User's Information: Tap the user you need to edit, and then tap Details. You can modify user's information, including username, passcode, duress code, arming and disarming permission on the user information page.
Card Management
-
Adding Card: Tap
 on the upper-right corner of the user information page to add card for the user. Press any key to wake up the keypad, and then place the card near the card swiping area of the keypad to enter to the linking process within 30 seconds.
If the card information is successfully recognized, the card ID will be displayed on the user information page, and then the keypad will beep once. After you save the configurations, the card will have the user's permissions.
Up to 8 cards can be linked to a user.
-
Deleting Card: Select the card, and then swipe left to delete the card.
SOS Alarm
You can enable or disable the SOS alarm and link the alarm to siren. The alarm types include SOS alarm, medical alarm and fire alarm.
Global Arming/Disarming
Tap / to enable or disable the arming/disarming button on the hub home page.
Schedule Arming/Disarming
Arm or disarm the areas by schedule. Tap Add to add a new scheduled arming/disarming.
- Name: Enter the name of the schedule.
- Area: Select the area in which the hub operates.
- Command setting: Select an armed mode as needed by tapping Home, Away, or Disarm.
- Time: Select the time period in which the hub operates.
- Repeat: Copy the arming or disarming schedule.
- Force Armed: After this function is enabled, the command for scheduled arming and disarming is invalid.
- If the system integrity check function is enabled and this function is disabled, the arming will be failed when an error occurs in the area.
- If this function is enabled, you can arm the area even if there is an error detected.
- Up to 8 scheduled arming/disarming can be added.
- To delete a scheduled arming/disarming, swipe left and then tap Delete.
Doorbell Sound Config
- For alarm hub 1.0, you can enable or disable the ringtone when entering or exiting the arming mode.
- For alarm hub 2.0, you can configure the ringtone parameters.
- Set the volume for the ringtone.
- Enable or disable the alarm/tamper sound prompts.
- Configure the sound prompts times of the alarm.
- Enable or disable the sound prompt for entering or exiting arming and disarming, and if the entering or exiting arming and disarming delay function is enabled, you can also enable or disable the sound prompt for it.
Intercom Service
For details, see Intercom Service.
LED Indicator
Enable or disable the indicator of alarm hub. When enabled, the LED indicator will light up for alarms, exceptions and arming or disarming statuses.
Phone Number Management
Tap Add to add a phone number to receive the event, and then select the event type that needs to send SMS. The event types include alarm, fault, operation, and whether the alarm is linked to the phone. You can add up to 12 numbers.
After adding, you can tap  next to the phone number, and select SMS Test or Calling Test to test phone calls and SMS messages to verify whether the current phone number is valid. You can also tap Delete to delete the phone number.
Tap the phone number to enter the phone number editing page, and then you can edit the number and select the event type that needs to send SMS.
Only 2G/4G devices support this function.
Test Mode
You can test the peripherals according to the rooms. Select a room and then tap Start to test the status of the peripherals connecting to the hub in different areas, and then tap Stop to complete detection.
Reduced Sensitivity Mode
Tap  to enable the function. The hub transmit power will be reduced.
Import Configuration
You can import the configuration data from the old alarm hubs.
- Tap Select Alarm Hub to select the device that you want to import the configuration from.
- Read the instruction on the screen, and then tap Start to start.
If the program version of current alarm hub is lower than the alarm hub that the configuration data is imported from, then you cannot import successfully and must upgrade the program version first.
Cloud Service Connection
Set the server-hub ping interval with the range from 150 to 900 seconds (300 seconds by default). If the D-cloud detects that the hub's offline duration exceeds 300 seconds, it will report the hub status to the user through app.
Heartbeat
Configure the hub-detector ping interval. The settings determine how frequently the hub communicates with the peripherals and how quickly the loss of connection is detected.
-
Detector Ping Interval: The frequency of connected peripherals operated by the hub is configured in the range of 12 seconds to 300 seconds (60 seconds by default).
The shorter the detector ping interval, the shorter the life span of the battery.
-
Number of Dropped Packets: A counter of undelivered packets is configured in the range of 3 to 60 (15 packets by default).
- The smaller the number, the more frequently the offline status of peripherals is detected and reported.
- If the hub constantly loses connection with the peripherals and cannot detect their defined heartbeats, it will report their offline status to the system.
Link Siren for Tamper
-
In the arming state, when the function is enabled, the hub will link the alarm sound.
The siren will alert when the lids of the hub and peripherals are open.
-
Always Active: You can tap
 to enable the function. When it is enabled, the siren will be linked no matter in arming status or disarming status.
System Integrity Check
When enabled, the hub checks the status of all detectors before arming, such as battery charge level, tamper incidents, and connectivity. If errors are detected, warnings will be displayed. Select the error types that you want to check by the system and receive the notifications.
- When you enable the main power failure detection, you can set the delay time for all system devices to activate related outputs.
- For the keyfob, the indicator flashes green, and then turns red.
- For the app, an alarm message pops up.
- For the keypad, it beeps for 1 second, the arming and disarming indicator flashes green for 2 seconds, and then it turns to the normal status.
CMS
Tap  to enable the function and then you can register the hub to Converter.
The function is only available when the version of the DMSS app is 1.96 or later, and the hub is V1.001.0000000.6.R.211215 or later.
Alarm Receive Central
- For alarm hub 1.0, you can tap
 to enable the function, and then set the SIA protocol parameters for the alarm receiving center (ARC).
-
IP address: Enter the IP address and port number of the ARC.
-
Alternative IP address: Enter the alternative IP address and port number of the ARC.
- Messages will be sent to the alternative IP address only when the preferred IP address fails to receive the message.
- If Heartbeat interval is enabled, the system will judge whether to send the message to the preferred or alternative IP address.
-
IP Protocol: Select TCP by default.
-
Heartbeat interval: Set the heartbeat interval with the range from 0 second to 24 hours (60 seconds by default).
0 seconds means Heartbeat interval is disabled.
-
Central account: Enter the account number that created by the ARC, which is to be used to identify the hub when the hub sends information to the ARC.
-
Encryption: The hub uses an encryption format for information security when you configure the ARC. AES128 is set by default.
-
Upload event: Tap
 next to an event to upload it.
- Alarm: Alarm message.
- Error: Power failure, battery under-voltage, tamper, and offline.
- Event: Prohibit the use of peripherals, add or delete peripherals, and add or delete users.
- Arming/Disarming: Message notifications of arming and disarming the system.
-
- For alarm hub 2.0, supports configuring 2 alarm receiving centers. Select an alarm receive central, and then tap to enable it. The parameter configuration is same as alarm hub 1.0.
Notifications
Tap to select the message types that you want to receive.